Sunday, December 30, 2012

Gianna's Library Bag


  Whoa.  It's been almost 3 weeks since I last blogged.

That's really too long!

The good news is that I've got a LOT of fun projects to show off in the new year, and a lot of things I'll be working on in 2013!

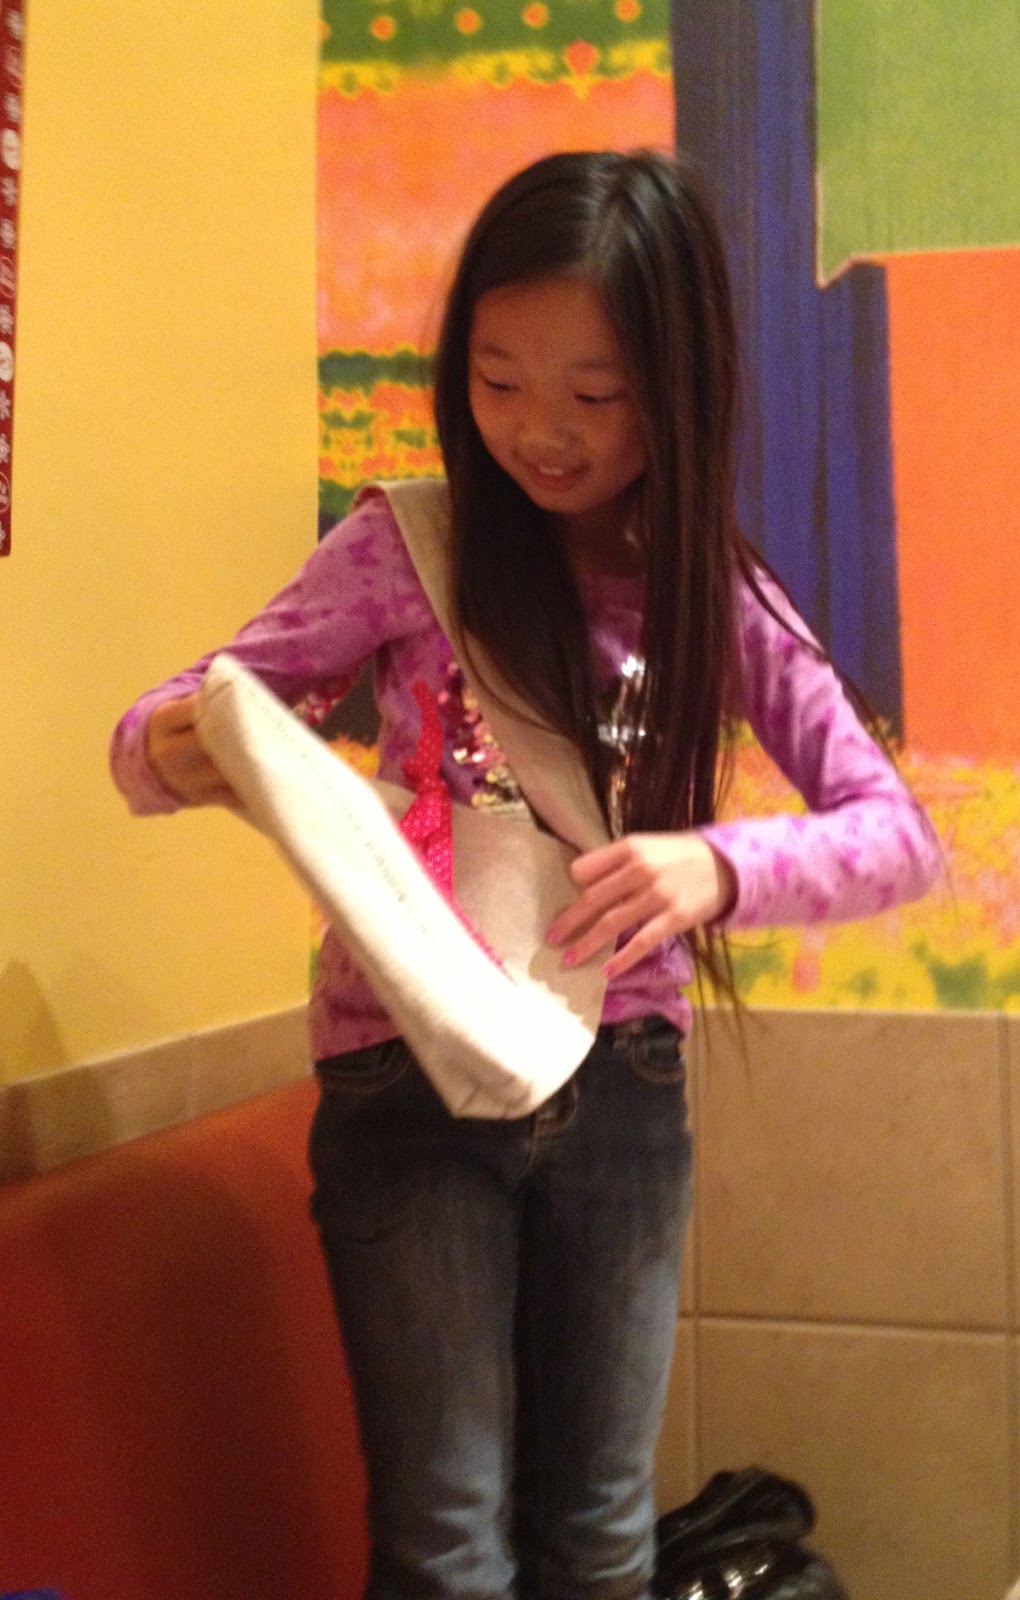
Today I want to show you the library bag I made for my daughter's 9th birthday.  She will be so excited to head to the library with this bag sporting her favorite insect - a ladybug!  


 I found the pattern in Sew Liberated by Meg McElwee


Gianna has been asking me to make this bag for her since I checked out Meg's book at the library.  I hope she loves it!  


I thought it would have been fun to fill her bag with library books before giving it to her, but I didn't finish it in time.   So, she gets the joy of filling it up for the first time!


Hope you all had a wonderful holiday.  See you in 2013!


What fun projects have you been busy working on?

Update:  She LOVES it!


Wednesday, December 12, 2012

What's In The Mail Today!


Guess what is in the bag?

Yep, it is a Doctor Who doll!

I will be posting pics of the doll in about a week when I finish making the 10th and 11th for my sons for Christmas.  This one is for a customer and I want her to see the doll first.  :)

Lots of pink in this little blondie! 


Her name is embroidered on the tummy.


And...I made this, but it's not in the mail, it's on the tree. 


 Every year my kids grab red and green construction paper to make a paper chain to count down to Christmas.  The other night at dinner my husband asked my daughter why she hadn't made a paper chain.  She told him we didn't have red and green paper.  I jokingly piped up and said, "I can sew one!"  (I kinda sew a lot) And he said, "No!  You don't have to make one!"  To which I (of course) said, "Don't boss me!"  (imagine Puddy is saying it to Elaine - like that)

So, I made one with felt and velcro!  Maybe next year I'll add numbers or some kind of decoration.

That's it for today. 

Thanks for stopping by!


Friday, December 7, 2012

Artist's Smock for Little Claire...


I've been really excited to blog about what I made for my youngest niece Claire for Christmas.

I'm excited because it's such a cute pattern, but mostly because I get to show off how STINKING adorable Claire is!


That's Claire getting her first haircut.


Adorable, right?


I bet you wish you looked that good in jeggings!

 "Yeah, I'm just hangin' out, bein' cute."

Are you dying of cuteness yet?

Trust me, I could post a million pictures of Claire, but there is an ever-so-slight-chance that you all would not enjoy that as much as I would.

But, you have to admit that a cutie pie as adorable as Claire really needed a super duper cute handmade Christmas gift, right? 

Then, read on...


As soon as I saw the artist's smock pattern in Sew Liberated by Meg McElwee, I knew I would be making one for Claire.


The smock is designed to fit ages 2-6, so it needs to last, which is why I chose navy blue kona cotton instead of white for the main color. 


Since Claire will be spending Christmas at Grandma and Papa's home in Italy, rather than embroider "L'aritiste" on the smock as the book directs, I chose to go with Italian and embroider, "L'artista".  


The pattern really was very easy to follow.  There were a few techniques that I had never done before and the directions made it very easy to follow.  

I would say that a beginner could definitely make this smock.

Here are full photos of the front and back:


I love how it just slips over the head with no fasteners to worry about.  It can easily be hung from a hook.  And, it grows with the child.

It's really a great pattern!

 I'm trying to do some re-usable gift wrapping this year and I thought the perfect little bag to wrap Claire's smock in is this one that I made using Jeni's Lined Drawstring Bag Tutorial.


So fun!

I'd love to hear how cute you think Claire is too, so feel free to comment.  ;)

Friday, November 30, 2012

Value Added QAL {Quilt Top}


What a FUN project this has been!

I had been wanting to do a chevron quilt when I saw that Rachel at Stitched in Color was planning a quilt along (QAL) with Leila (Where the Orchids Grow), Amy (Badskirt), and Jolene (Blue Elephant Stitches).  I thought joining the QAL would be a great way to make that chevron quilt.  

I learned so much about value from these amazing quilters! 

Converting a color photo to black and white, I learned, is a great way to see value.  Isn't that cool?

 
Until making this quilt, I didn't give value a thought.  I would just choose fabrics that I loved - usually bright, bold (and relatively dark) fabrics.  The way I chose to study value in this quilt also involved a color study.   I wanted it to have a simple and clean look.

The inspiration for this quilt came when I saw a very bright and colorful Mexican serape blanket like this.   I wanted to do something similar using colors I loved and a chevron pattern.


Learning something new  in sewing (in this case making a chevron top) takes so much mental energy for me that I didn't want to have to also worry about numbers.  I just purchased the smallest cut of fabric my fabric store would cut and that determined the size of the quilt. I chose a dark in value patterned fabric then 3 solids in the same color but each differing in value for each color:  orange, green, blue, purple and pink.  


After using white in my last quilt and not really loving it (love the quilt, not the white), I knew I was going to use a natural linen to make the colors stand out.  Linen isn't soft and isn't that much fun to work with, but I absolutely adore the rustic and natural look next to the bright colors. 


I will set this quilt aside for a week or so while I work on some Christmas doll orders.  In the meantime, I'll decide how to finish the quilt.  I am trying to decide whether or not to add a linen border.  Do you think I should add a border or leave the top as is?  I'd love to hear your input.  

As always, the kids and I had fun taking quilt pics!  

Here they are throwing rocks in the desert:


 My quilt holder finding a good spot to stand:


 My totally-not-photo-shy 14 year old:


Thank you Rachel, Leila, Amy and Jolene for hosting this QAL!

The next value quilt I am going to make will focus more on value and less on color.  It is the second picture in this tutorial by Sew Katie Did.

Monday, November 26, 2012

White {yes, WHITE} cloth napkins!


What do you do when:

you are too sick to be out and about but not too sick to be in bed all day;

you are depressed because you realize you are going to need to lose a good chunk of weight before you can train for that marathon you wanted to run;

you are disgusted that your house hasn't been thoroughly cleaned in forever;

and 

you are avoiding a huge project that needs to be finished?

I don't about you, but,  I make white {yes! WHITE} cloth napkins for my family.


 Could this be the sign of a deranged mind? 

White everyday napkins for the messiest family in the world?


It just so happens that I had the fabric on hand and I really wanted to embroider each one with an initial in our favorite colors. 


I followed two tutorials to make these:  here and here.


So, there you have it.  White embroidered napkins.  Tell me I'm not crazy.

Thursday, November 15, 2012

What's In The Mail Today!


Three fun dolls are in the mail today on their way to their new happy owners!

First, here is sweet little Norah:


She's super cute, but I think she needs a tutu, don't you?


That's better!

These two Super Dolls are headed to Oregon.  They have their trusty Super Dogs with them!


It feels good to have all 3 dolls on their way.  

Tomorrow it's back to quilting.  I'll also be making curtains for my sister's bathroom.  Fun!

Wednesday, November 14, 2012

What I'm Working On Today...


It's all dolls, all day today!

 I'm about to turn on the tube and watch a bit while I stuff arms and legs.

These should be in the mail tomorrow.


I just love the bandit Superheros and the sweetie with the blue/green eyes.

What are you working on today?


Tuesday, November 13, 2012

Scrappy Stash QAL [Quilt Along] - Finished!


My first QAL!

I had such a great time making this quilt and participating in the Scrappy Stash QAL!  Jennifer at Ellison Lane Quilts hosted this QAL and it was a great experience for my very first QAL!  

I see many more QALs in my quilting future.  :)

My quilt blocks were 10.25" and the finished size of the quilt is 50"x60" - the perfect size for a lap quilt!  


I used the QAYG [Quilt As You Go] method for my blocks.  


I love almost everything about QAYG.  It is easy and I really like the look of the quilting on the front of the blocks.  


The one thing I don't like about QAYG is that the quilting on the back isn't very beautiful. 


I added 3 strips on the back to tie in some of my scraps in a rainbow order.

I am pretty proud of how my corners turned out:


So that the blocks would stand out, I added white to the monochromatic blocks.  Half of the blocks have white in the middle and half have white around the outside.  


One fun thing about quilting is taking the photos.  I did not love the pictures I took of the completed quilt.  I'm still learning about lighting.

But, my helpers always make me laugh!


The completed quilt:


I love how it turned out! 


Thanks for taking a look at my Scrappy Stash QAL quilt!

xo